Change Infrastructure
In this tutorial, you will change the name of your AWS EC2 instance by adjusting a Terraform variable in the Terraform Cloud web UI. You will also add an additional tag to your instance by opening and then merging a pull request to your configuration repository.
Now that you have provisioned infrastructure with Terraform Cloud, you are ready to make changes to that infrastructure.
There are two ways to update your workspace deployments on Terraform Cloud:
- Changing the configuration in VCS
- Updating variables in the Terraform Cloud UI.
Explore your workspace
The landing page for a workspace includes an overview of its current state and configuration.

On the upper right hand side, you can find a resource count, the workspace version, and the time since the last update.
Along the top is a menu of available actions and configurations for the workspace.
- The Runs tab shows a list of all the plan and apply actions you have taken with this workspace.
- The States tab shows the state of your workspace after each successful run. Terraform stores everything it knows about your infrastructure in state as a
tfstatefile. This allows Terraform to not only create — but also manage — your infrastructure as it changes over time. - The Variables tab is where you configure Terraform variables and environment variables.
- Settings contains all the Terraform Cloud settings for your workspace, and is where you will destroy your infrastructure at the end of these tutorials.
- The lock icon indicates whether the workspace is locked, preventing others from triggering new runs.
- The Actions menu allows you to lock the workspace or trigger a new run.
The workspace overview shows details about the most recent run and current settings for your workspace.
- The Latest run section displays details of the last run, including a count of resource modifications, duration, and estimated change in cost.
- The resources and outputs tables display details about the current infrastructure and any outputs configured for the workspace.
- The sidebar contains metrics and details about workspace settings.
Scrolling further down, you’ll find the README for the repository, if one
exists.
Edit variables
Infrastructure-as-code allows you to share and recreate infrastructure. Variables make your configuration flexible enough to use in different contexts. Changing variables is one of the most common ways to customize or update infrastructure, and you can do it from the Terraform Cloud web UI.
In the Terraform Cloud UI, return to the “Variables” section of your workspace.
Change the value of instance_name from Provisioned by Terraform to Updated by Terraform and click the purple “Save variable” button.
Select the “Start new plan” option from the “Actions” menu and use the pre-selected option, “Plan (most common)”. Then, click on “Start plan” to queue your plan run. After the plan completes, the plan log should indicate that there are 0 to add, 1 to change, 0 to destroy.

In this case, Terraform can make the change to the EC2 instance without destroying and recreating it. Click the “Confirm & Apply” button, followed by the “Confirm Plan” button to apply the change.
Enable speculative plans
Terraform Cloud workspaces can run speculative plans to show you the changes Terraform would make to your infrastructure if you merge a pull request.
Speculative plans are:
- plan-only runs - you cannot apply the proposed infrastructure changes until you merge the PR
- temporary - they will not appear in any Terraform Cloud logs
- individual - you can only access them from a direct link on a GitHub PR
- non-destructive - no action is taken, infrastructure is not provisioned
Verify that your workspace has speculative plans enabled. Under the “Settings” tab, click “Version Control”. Set “Automatic speculative plans” to enabled, and click “Update VCS settings”.

Edit configuration
If you work on the team that maintains your infrastructure, you may need to develop your configuration by modifying configuration files. You will edit your infrastructure as code with the same workflow you use to make changes to other code, by opening a Pull Request (PR). Terraform Cloud pulls configuration files from their source of truth in version control to propose and apply changes to your infrastructure.
The repository you forked already includes a branch named add_tag that adds an additional tag to your EC2 instance. Usually, you would edit and test the configuration locally using the Terraform CLI, push the changes to a branch, and then open a PR. For this tutorial, we have made the changes for you.
Visit your forked tfc-guide-example repo in GitHub and click “New pull request” button to create a pull request.
Set the base repository to your fork of the tfc-guide-example repo (not the fork in the HashiCorp organization) and the base branch to the master branch. Set the compare branch to add_tag.
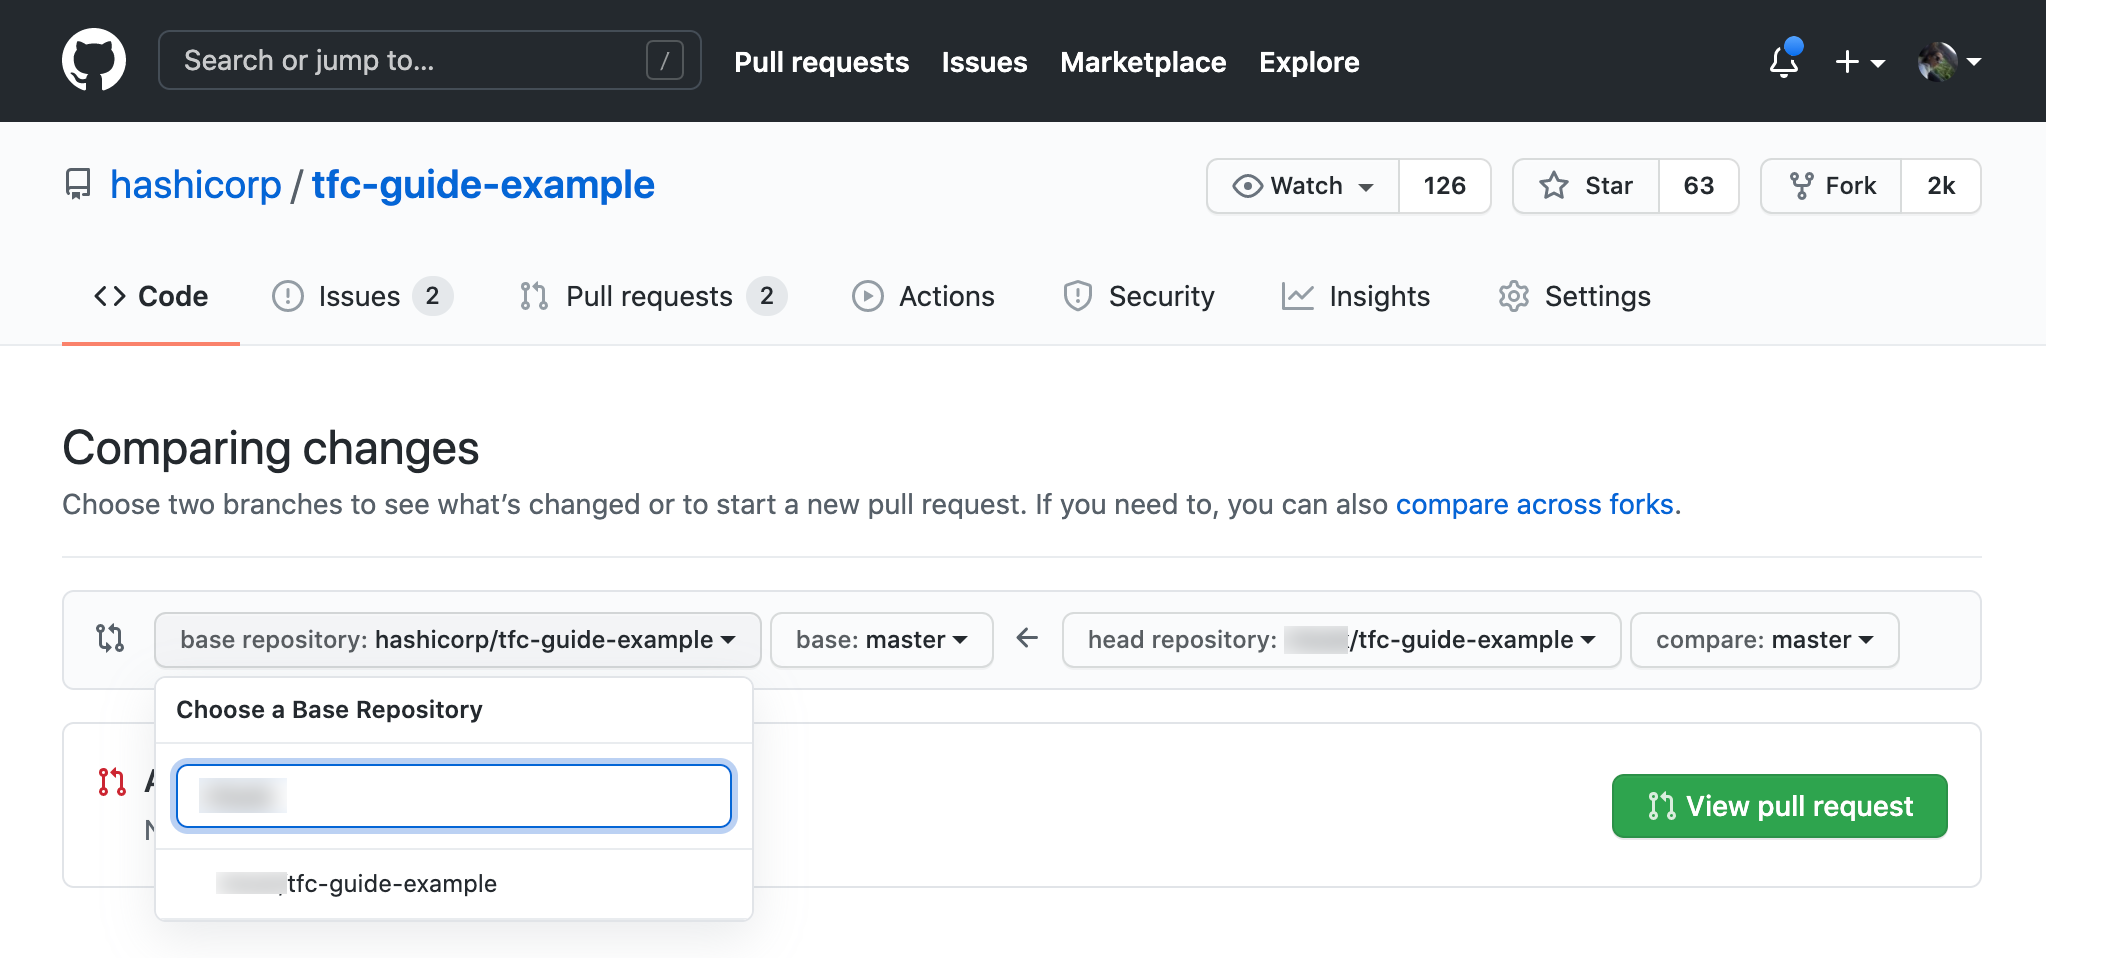
You must create the PR against your personal forked repository. You will need to merge the PR later in this tutorial, and you cannot merge to the official example repo.
Create the pull request by clicking through the GitHub UI. Once you have created the pull request, Terraform Cloud will trigger a speculative plan.
View this plan from GitHub by clicking on the “Details” link in the “Checks” portion of your pull request.

When the speculative plan finishes, you and your teammates can review it before approving or merging the pull request. This is another way that Terraform Cloud enables teams to collaborate on planned infrastructure changes.

Speculative plans cannot be applied, because applying them would cause your infrastructure to differ from the configuration on your main branch of your connected repository. You must merge the pull request before you can apply this change.
Return to the GitHub UI, and merge the pull request with the “Merge pull request” button.
Switch back to the “Runs” tab for your workspace in Terraform Cloud. Terraform Cloud has picked up the change to your configuration and started a new run. When the plan completes the run will wait for your approval. Click on the new run in the Terraform Cloud UI.
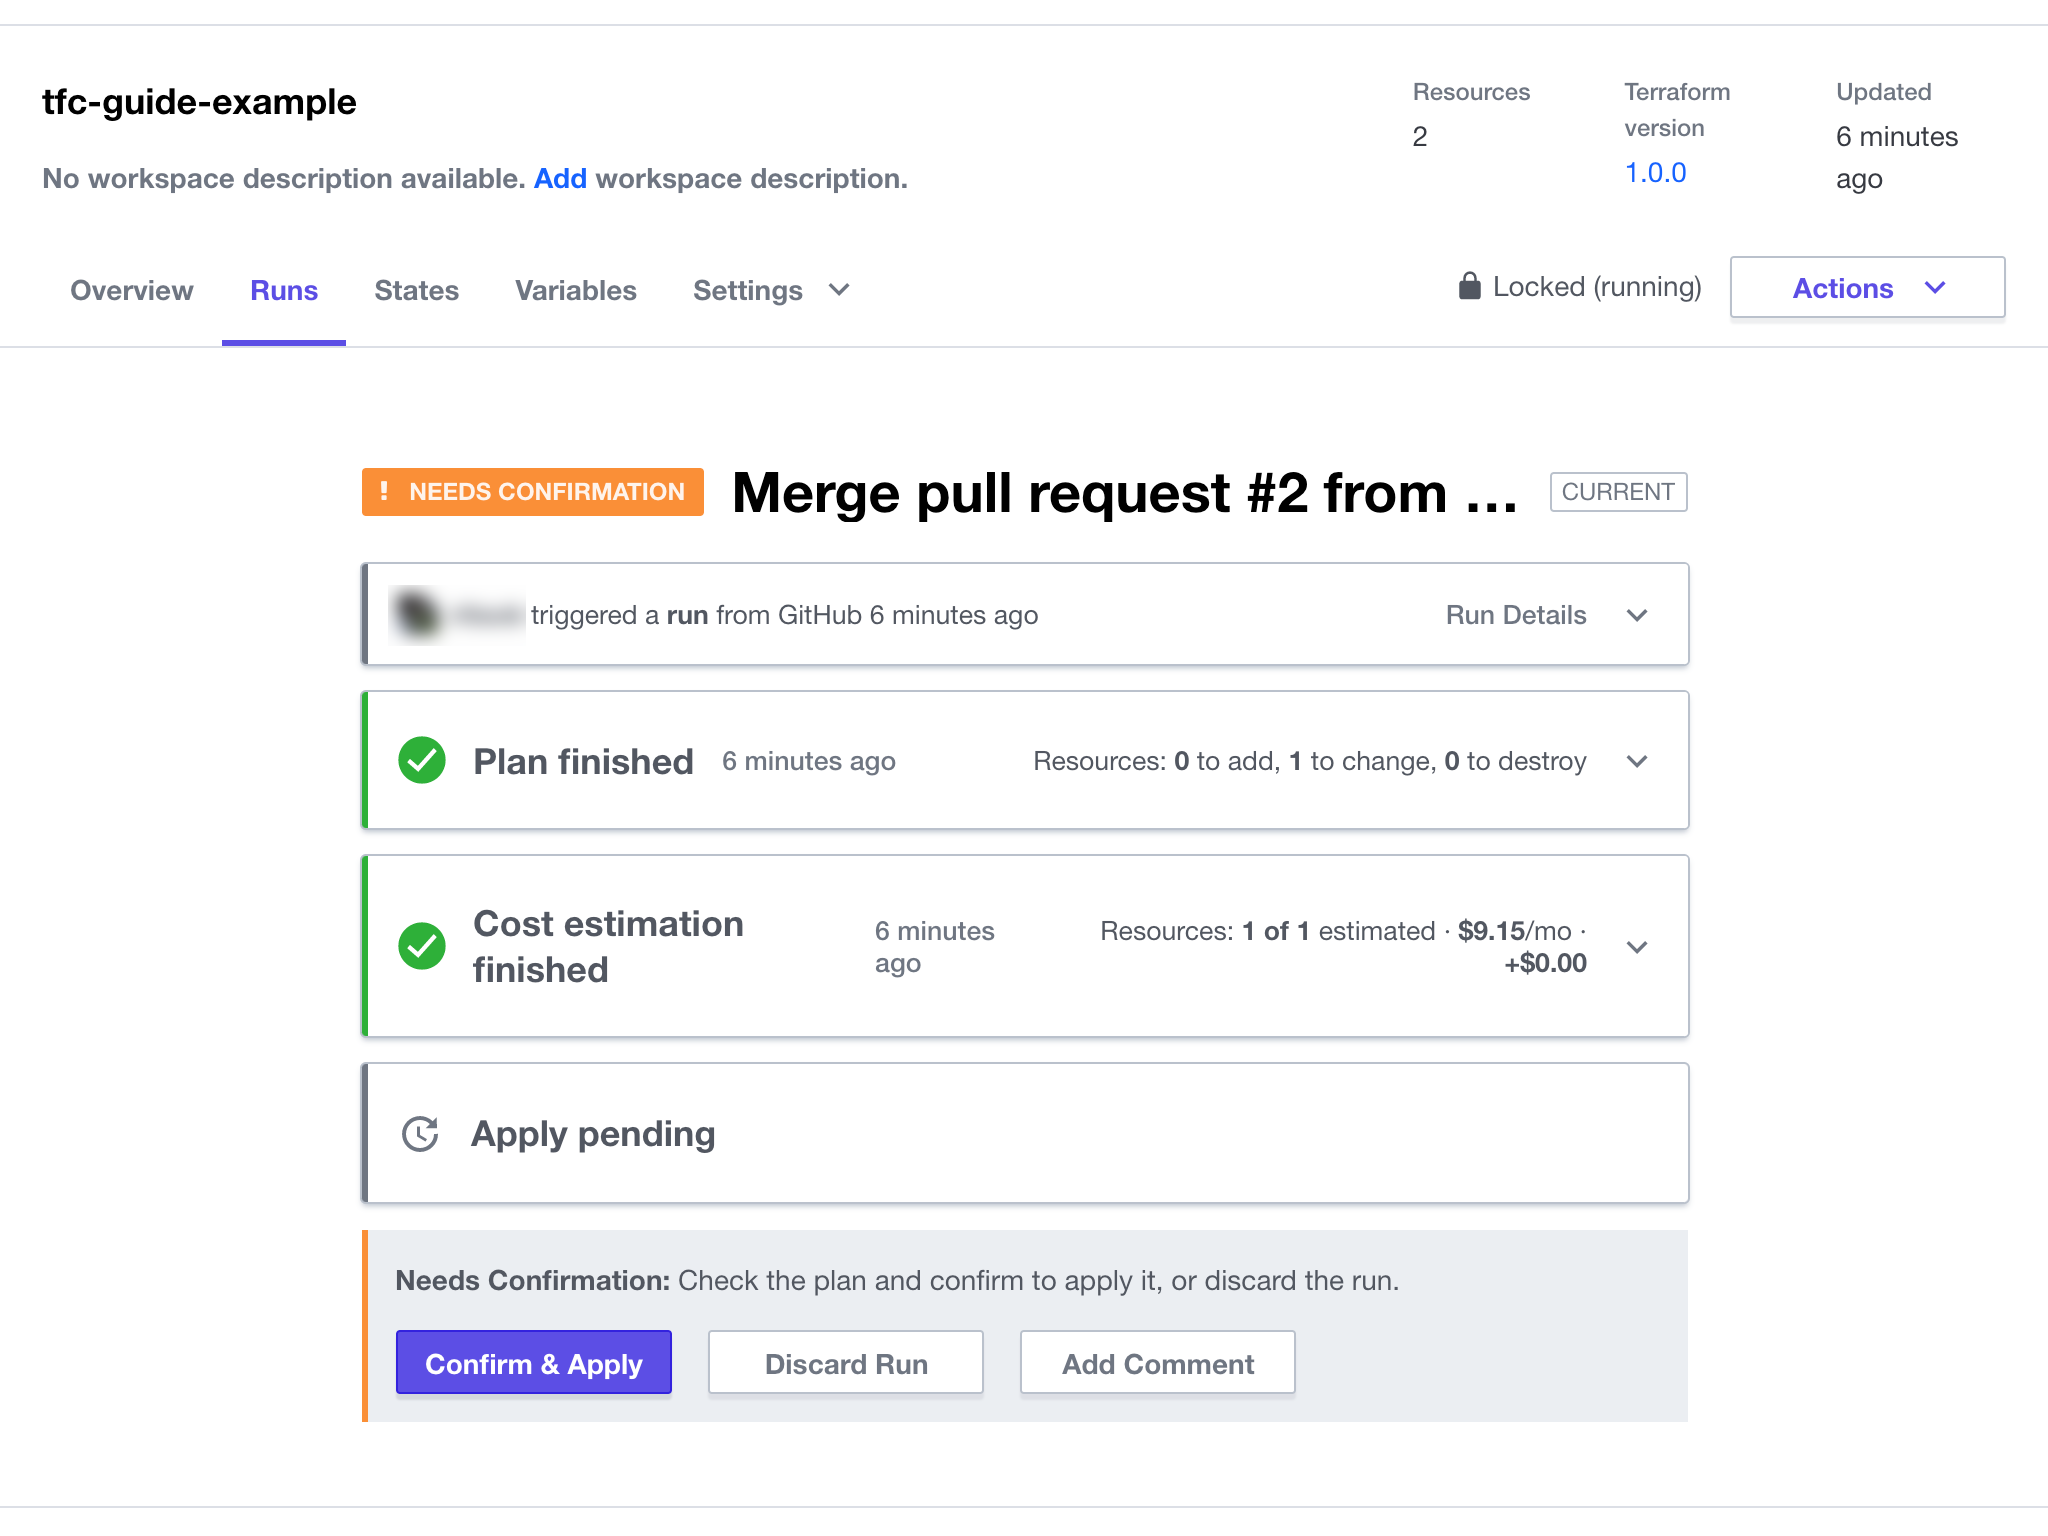
Review the run details. “Confirm & Apply” the run. Once it completes, you can verify that Terraform added the tags by searching for the EC2 instance in the AWS console.
Next Steps
The Terraform documentation contains more details on state, the VCS-driven workflow, and speculative plans.
In these tutorials, you configured a new workspace, provisioned infrastructure, and updated that infrastructure. Now, you are ready to destroy the resources and workspace.
In the next tutorial, you will clean up the resources created by your configuration and find additional learning materials on Terraform’s configuration language.